|
Accessing Eprentice
Using Fetch |
||
|
|
||
|
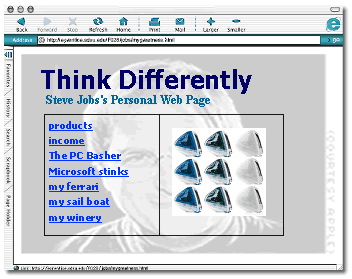
It is important to understand the difference between a remote computer and a local computer. The computer that you are working on in the lab is called the local computer; the Web server where you put a copy of your files is called the remote computer (eprentice.sdsu.edu). Fetch allows you to open a connection so you can send files back and forth between your computer and the remote eprentice computer. Scroll down to follow along with our fictitious EDTEC 470 student named Steve Jobs as he models how to publish his personal Web page called mygreatness.html to the eprentice server; you will soon complete these steps when you upload your own Web page to the eprentice server. After you put or publish your Web files into your personal folder on the eprentice server your Web page is officially on the Internet and can be seen by anyone who types its location into their Internet Explorer (or Netscape) browser’s address field. The first part of the Web address (i.e. http://eprentice.sdsu.edu) never changes and is the same for all EDTEC students who have folders on the server. But, the last part of the address is unique and points to each student's section of EDTEC 470, his or her last name, and the name of his or her Web page. For example, let’s pretend Steve’s in EDTEC section F028, his last name is Jobs, and he uploaded a page called mygreatness.html. His Web address would be: http://eprentice.sdsu.edu/F028/jobs/mygreatness.html
|
||
|
NOTE:
If you need to get Fetch at home, click here
to save the program directly to your own iMac computer. Your instructor
can provide you the serial name and number for your home installation.
|
||
|
1.
|
To start Fetch, Steve clicks the puppy dog on his launch menu.
|
|
| NOTE:
|
|
|
 |
or
|
|
|
2.
|
After Steve starts Fetch, he is presented with a window that says
New
Connection. To open a remote session with the
eprentice server, he types in the following information: Host:
eprentice.sdsu.edu
He then clicks OK… |
|
|
3.
|
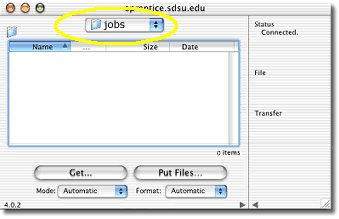
…this opens a connection to the F028 course folder (i.e. directory) where all the folders for Steve and his classmates are stored on the eprentice computer- notice how Fetch displays Status Connected to let Steve know he has an active session. In other words, this means that Steve is now looking at files and folders that are physically stored on another computer! Pretty neat, huh? This is why it is called a remote connection. NOTE: The first time you open the connection to the course folder you will create your personal folder with help from your instructor.
Steve looks for his folder and double-clicks it…
|
|
|
4.
|
…to get into his personal space on eprentice. He knows that
he is in his personal folder because his last name is listed in
the top drop-down box.
|
|
|
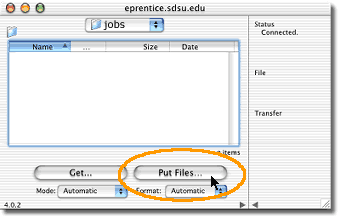
5.
|
With his connection open, Steve is ready to put a copy of his Web page and corresponding files on the remote server. To do this, he clicks the Put Files button… NOTE:
It is also possible to publish your files to eprentice by
dragging-and-dropping them into the folder window. However,
this will only work if the computer is set up to handle this type
of operation!
|
|
|
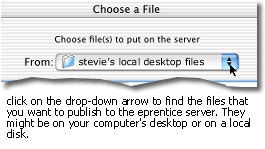
6.
|
…and the Choose a File window opens. Steve uses the drop-down box to navigate to the folder on his local computer where his Web page files are stored. Remember, the Web page files you want to publish to eprentice could be located on your computer's desktop or on a zip disk.
NOTE: Keep in mind that you might need to scroll the window bar laterally to find files on your computer's desktop or external disk! |
|
|
7.
|
Then, Steve selects the files (hold down the APPLE key to select multiple files) associated with his Web page that he wants to put on the eprentice server and clicks the Choose button. Notice how Steve selects all the files associated with his Web page including the images to upload to the eprentice server!
|
|
|
8.
|
After clicking the Choose button, a Put File box appears for each file that Steve wants to publish. Steve could choose to rename the files at this step, but instead leaves the file names as they are and clicks the OK button. This puts a copy of each of the file(s) into Steve’s personal folder on the remote eprentice Web server. CAUTION! It is recommended that you DO NOT rename files during this step because it could cause file integrity problems! Your instructor will explain more to you about these potential pitfalls in class.
|
|
|
NOTE: Generally, leave the format option set to Automatic when you put your files on eprentice. That said, keep in mind the format is important, especially when uploading images. If the system doesn't recognize the correct format during the transfer the images may not show up later in your Web site. However, leaving the format set to Automatic works well most of the time. Your instructor can give you more information about this issue if Web page visibility problems surface in the future.
|
||
|
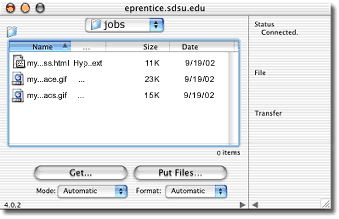
9.
|
Steve knows his files were sent successfully when he sees them in his folder in the eprentice.sdsu.edu window. It is time to check the Web to see if his page looks hunky-dory! NOTE: Remember, the files on eprentice are copies of the original files on your disk. The images in your Web page only need to be published to the eprentice server ONE (1) TIME. However, when you make a change to your Web page you edit the original file on your disk and then REPUBLISH the page again using Fetch to the eprentice server. This means that you will continue to overwrite or replace the older version of your Web page with an updated version. |
|
|
10.
|
To check his page on eprentice, Steve opens either Internet Explorer or Netscape and types the URL for his Web page in the address field. Remember, the first part of the Web address (i.e. http://eprentice.sdsu.edu) never changes and is the same for all EDTEC students who have folders on the server. But, the last part of the address is unique and points to each student�s section of EDTEC 470, his or her last name, and the name of his or her Web page. So, because Steve�s in EDTEC section F028, his last name is Jobs, and he uploaded a page called mygreatness.html, his Web address is: http://eprentice.sdsu.edu/F028/jobs/mygreatness.html What will be your Web address??? |
|
|
|
||